The next thing I’m going to go through is how to push a new view onto the stack when the user taps the annotation’s call out button. This is relatively straight forward with one annotation, but is a little bit more complicated when it comes to multiple annotations that have all been created dynamically. In this tutorial we’re just going to start out with one and then move onto multiple annotations in the next one. As with all my tutorials you can download the final project to play around with. I’ve also included a second project download mid way through, just because this is a long tutorial.
The first thing we need to do is take a step back and pull apart what we’ve done so far by adding in a Navigation View Controller. Without the navigation controller we won’t be able push and pop the UIViews in and out.
Step 1.
Create a new file, a UIViewController subclass, make sure you have “with Xib for user interface” selected and name it MapNavViewController.
Step 2.
Open the MapNavViewController and make it extend UINavigationController:
#import <UIKit/UIKit.h>


@interface NewsNavViewController : UINavigationController {

}

@end
Step 3.
Now we need to update the update our application delegate to load in the navigation controller. Open the MapKitTutorialAppDelegate.h file and get it looking something like this:
#import <UIKit/UIKit.h>
@class MapKitTutorialViewController;
@class MapNavViewController;

@interface MapKitTutorialAppDelegate : NSObject <UIApplicationDelegate> {
    IBOutlet MapNavViewController *mapNavViewController;
}

@property (nonatomic, retain) IBOutlet UIWindow *window;
@property (nonatomic, retain) IBOutlet MapNavViewController *mapNavViewController;
@property (nonatomic, retain) IBOutlet MapKitTutorialViewController *viewController;

@end
We’ve created an IBOutlet for MapNavViewController class, this will allow us to associate this instance with our component we are about to create in Interface builder. Now get the app delegate .m file looking like this:
#import "MapKitTutorialAppDelegate.h"
#import "MapNavViewController.h"

@implementation MapKitTutorialAppDelegate

@synthesize window, mapNavViewController;

- (BOOL)application:(UIApplication *)application didFinishLaunchingWithOptions:(NSDictionary *)launchOptions
{
    [self.window addSubview:mapNavViewController.view];
    [self.window makeKeyAndVisible];
    return YES;
}
- (void)dealloc
{
    [window release];
    [mapNavViewController release];
    [super dealloc];
}

@end
Step 4.
I’d be lying to you if I told you the next bit wasn’t a bit tricky, if you’ve never done it before and you stuff it up don’t let that deter you, download the working files and try and compare everything I’ve done to what you’ve done and see if you can work it out. Making mistakes, and then solving them is the best way of learning.
I’m going to use interface builder, but it can be done only with code.
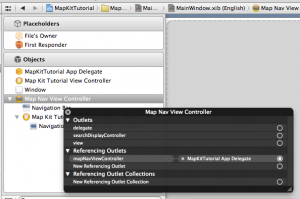
We need to set up our MainWindow.xib file so the it loads the MapNavViewController. open MainWindow.xib and drag on a new NavigationController component. Select the navigation controller and link it to the MapNavViewController class in the identity inspector. Expand out the Navigation Controller and select the ViewController and link this to the MapKitTutorialViewController class in the identity inspector.
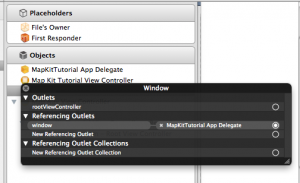
Now we need to link some of the objects up, right click (or control click) on the window component and create a new referencing outlet that links to the MapKitTutorial App Delegate.

Right click on the MapNavView Controller and also link it to the MapKitTutorial App Delegate.

If you were unable to get it working, you can download the working project up to this point here. Download it and compare it to what you’ve done.
If you were able to get it running, you won’t see much difference, just a big ugly navigation bar at the top. This will allow us to now push in a new view when the user taps on a map annotation.
Step 5.
Now it’s important to set the delegate of the mapView inside of MapKitTutorialViewController.xib file, So open this, right click on the map and link it’s delegate to the file’s owner.
Step 6.
Now’s probably a good time to create a view that will be pushed when the user clicks the annotation. So create a new UIViewController subclass with xib file. Call it MapDetailView. Feel free to add some text to it in the xib file just so you know it’s been pushed into view when the user taps.
Step 7.
It’s time to update our MapKitTutorialViewController.m file with a few new lines of code in the viewForAnnotation delegate method and by creating a selector to be triggered on tap. So get your MapKitTutorialViewController.m looking like this:
#import "MapKitTutorialViewController.h"
#import <MapKit/MapKit.h>
#import "SydneyAnnotation.h"
#import "MapDetailView.h"

@implementation MapKitTutorialViewController
@synthesize mapView;

- (void)dealloc
{
    //dealloc
    [super dealloc];
}

// Implement viewDidLoad to do additional setup after loading the view, typically from a nib.
- (void)viewDidLoad
{
    [super viewDidLoad];
    self.mapView.mapType = MKMapTypeStandard;

    // set the map to show Sydney
    MKCoordinateRegion sydneyRegion;
    sydneyRegion.center.latitude = -33.870883;
    sydneyRegion.center.longitude = 151.2025;
    sydneyRegion.span.latitudeDelta = 0.05;
    sydneyRegion.span.longitudeDelta = 0.05;
    [self.mapView setRegion:sydneyRegion animated:YES];
    // annotation for Sydney
    SydneyAnnotation *sydneyAnnotation = [[SydneyAnnotation alloc] init];
    [self.mapView addAnnotation:sydneyAnnotation];
    [sydneyAnnotation release];
}

- (MKAnnotationView *)mapView:(MKMapView *)mapView viewForAnnotation:(id <MKAnnotation>)annotation
{

       static NSString* SydneyAnnotationIdentifier = @"SydneyAnnotationIdentifier";

        // if an existing pin view was not available, create one
        MKPinAnnotationView* pinView = [[[MKPinAnnotationView alloc]
                                               initWithAnnotation:annotation reuseIdentifier:SydneyAnnotationIdentifier] autorelease];
        pinView.pinColor = MKPinAnnotationColorPurple;
        pinView.canShowCallout = YES;

    UIButton* rightButton = [UIButton buttonWithType:UIButtonTypeDetailDisclosure];
    [rightButton addTarget:self
                    action:@selector(showDetails:)
          forControlEvents:UIControlEventTouchUpInside];
        pinView.rightCalloutAccessoryView = rightButton;
       return pinView;

}

- (void)showDetails:(id)sender
{
    MapDetailView *aMapDetailView = [[MapDetailView alloc] initWithNibName:@"MapDetailView" bundle:nil];
	[self.navigationController pushViewController:aMapDetailView animated:YES];
	[aMapDetailView release];
}

@end
So you can see we’ve updated viewForAnnotation method, pinView.canShowCallout = YES, allows us to show a button to be tapped, then we’ve set this button to be of buttonWithType:UIButtonTypeDetailDisclosure type. We’ve also added a selector (method) to be triggered on the action. The selector is: showDetails and it creates and pushes an instance of the MapDetailView class we made previously.
That’s essentially the hard part done, everything from now on just adds to this framework. In the next tut I’ll be showing you how to add multiple annotations dynamically, that also push dynamic views.
Top Travel Destinations
Great post however I was wondering if you could write a litte more on this topic? I’d be very grateful if you could elaborate a little bit further. Cheers!
My travel blog Top Travel Destinations.
tryer77
thanx for this info it is really helpful appreciate it 😉 also have you done the info with the multiple annotations?
samkeeneinteractivedesign@gmail.com
Hi Tryer77,
this can be done for multiple annotations, you just need to implement this delegate method :
and then cycle through all of the annotations and compare it to the one you’re looking for, similar to this:
 MyAnnotationView *annotationView = [[[MyAnnotationView alloc] initWithAnnotation:annotation
                                                                     reuseIdentifier:RestaurantAnnotationIdentifier] autorelease];
    annotationView.canShowCallout = YES;

    //cycle through annotations and parse data into custom annotationView class
    for (int i = 0; i<[self.mapAnnotations count]; i++) {
        if([self.mapAnnotations objectAtIndex:i] == annotation){
            NSLog(@"CREATING NEW ANNOTATION");
            MyAnnotation *aMyAnnotation= (MyAnnotation *)[self.mapAnnotations objectAtIndex:i];
            annotationView.description = aMyAnnotation.description;
            annotationView.imageURL = aMyAnnotation.imageURL;
            annotationView.venueObject = aMyAnnotation.venueObject;

        }
    }